Optic Mounting Solutions: Height Over Bore Explained
What This Article Covers
This guide explains how optic height over bore (HOB) changes the relationship between your line of sight and the bullet’s path. It focuses on practical effects like zeroing, close-range offset, and head position, and compares common mounting standards without recommending a single “best” height.
Key takeaways
- Higher mounts increase close-range offset and change your holdovers.
- Co-witness standards are geometry, not rankings.
- Tall mounts favor heads-up posture and gear clearance.
- Consistency matters more than chasing a perfect number.
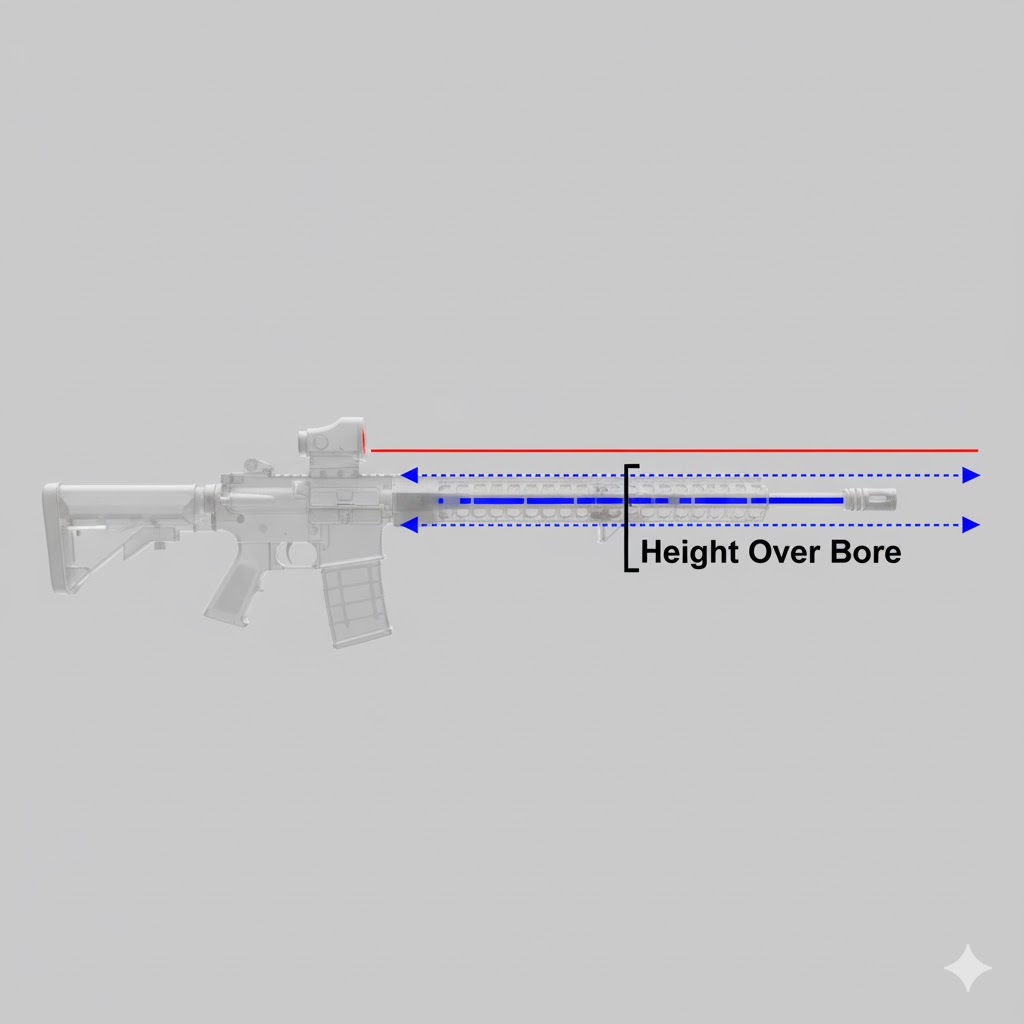
Defining Height Over Bore (HOB)
Height over bore is the vertical distance between the center of the barrel and the center of the optic. On the AR-15, the rail already sits well above the bore, and mounts add additional height. Typical centerline heights include:
- Low mounts: about 1.50-1.60 inches
- Absolute co-witness: about 1.54 inches
- Lower 1/3 co-witness: about 1.64-1.93 inches
- Tall mounts: about 2.0-2.26 inches and higher
These are mechanical measurements. They describe geometry, not preference. In other words, HOB Height over bore (HOB) is the vertical separation between the optic centerline and the barrel bore centerline. is a number, not a value judgment.
How Height Affects Bullet Path vs. Line of Sight
The line of sight is a straight line from the optic. The bullet leaves the bore below that line and travels upward toward it because the barrel is angled slightly up when you zero the rifle. The bullet crosses the line of sight at the zero distance and then drops below it again farther out.
Higher mounts increase the angle between the bore and the line of sight. That has several practical effects:
- The close-range offset is larger because the bullet starts farther below the sight line.
- The distance to the first intersection changes slightly depending on zero.
- The bullet arc can rise higher above the sight line before dropping back down.
- Holdovers at distance change because the sight line is higher.
A simple way to picture it: draw a straight line for the optic, then a lower line for the bore that tilts upward to meet it. The greater the separation, the more noticeable the offset before the two lines intersect.
The Mechanical Offset at Close Range
At very close distances, the bullet will always strike low relative to the point of aim. This mechanical offset Mechanical offset: the vertical separation between the optic and the bore that causes a consistent low impact at very close range. is not a zeroing error; it is the geometry of the system. Taller mounts increase this offset, which is why close-range holds matter more with higher optics.
The Co-Witness Standards
Absolute Co-Witness
Absolute co-witness means the iron sights align in the center of the optic window. The centerline height is roughly 1.54 inches. This is considered a “low” setup by modern standards, minimizes offset, and supports a traditional cheek weld Cheek weld: the consistent contact point of your cheek on the stock that stabilizes head position.. The tradeoff is that the front sight post and rear aperture occupy more of the optic window.
Lower 1/3 Co-Witness
Lower 1/3 co-witness places the irons in the bottom third of the optic window. Heights are typically around 1.64-1.93 inches depending on the optic and mount. This reduces visual clutter while keeping irons usable. The cost is slightly more HOB and slightly more close-range offset.
Co-Witness vs. Backup Use
Co-witness standards are about alignment, not a requirement for backup irons. Lower 1/3 still allows iron use; the irons just sit lower in the window. If backup irons are a priority, the main consideration is that you can see them clearly and access them quickly, not which co-witness height is “correct.”
Why Taller Mounts Became Popular
Mounts in the 2.0-2.26 inch range have grown in popularity for specific use cases:
- Passive aiming under night vision, where extra height clears the device.
- A more heads-up posture that reduces neck strain.
- Better compatibility with helmets and body armor.
- Preference for an upright head position during movement.
These advantages are contextual. Taller mounts can be very effective, but they are not inherently better for all rifles or all ranges.
Close-Range Offset: The Mechanical Reality
Before the bullet reaches the zero distance, it will strike low. The amount depends on HOB and the chosen zero. For example:
- Around 1.5 inches HOB with a 50-yard zero can be about 1.5 inches low at 7 yards.
- Around 2.26 inches HOB with a 50-yard zero can be about 2.5 inches low at 7 yards.
These numbers are approximate and vary with ammunition and zero choice, but the geometry is consistent. Some shooters choose a closer zero (such as 36 yards) to reduce close-range offset, accepting a different midrange rise as the tradeoff.
Zero Distance: Why It Still Matters
Your zero distance Zero distance: the range where the point of aim and point of impact intersect. controls where the bullet crosses the sight line and how much it rises or drops relative to that line at other distances. Taller mounts do not change the basic concept of zeroing, but they can make the close-range offset more noticeable and the midrange arc slightly higher. Choosing a zero is a balance between close-range holds and midrange trajectory, and the best choice depends on the distances you shoot most.
Mounting Height and Shooting Position
Mount height affects how you interface with the rifle:
- Lower mounts favor a traditional cheek weld and firm stock contact.
- Mid-height mounts balance speed and a familiar head position.
- Tall mounts promote a heads-up posture and can be easier with helmets, night vision, or armor.
No single position is correct for every shooter. The best fit depends on gear, body shape, and how the rifle is used.
Mounting Height and Magnified Optics (LPVOs)
Magnified optics are more sensitive to head position because of eye relief. Most LPVO mounts are designed around the 1.5-1.93 inch range. Taller mounts can work, but they often require a different stock position or a cheek riser to stay consistent. Red dots are more forgiving because their eye box is larger.Choosing a Mounting Height: Factors to Consider
When selecting a height, consider:
- Use case: night vision and armor favor taller mounts; general use often fits mid-height.
- Gear constraints: helmets and chest rigs change how low you can get behind the optic.
- Typical distances: close-range work benefits from lower offset.
- Optic type: red dots tolerate more height variation than LPVOs.
- Personal ergonomics: the most stable position is the one you can repeat.
This is a tradeoff decision, not a universal rule.
The “Industry Standard” Drift
Mounting height standards have shifted with use cases. Early red dots were commonly absolute co-witness. Lower 1/3 became the default as optics improved, and taller mounts gained traction with the rise of night vision and armor-heavy setups. The shift reflects changing needs, not a single correct end point.
Common Misunderstandings
- “Taller is always better.” Taller is better for some use cases, worse for others.
- “Height over bore does not matter at 100 yards.” It still changes the arc and close-range offset.
- “You need absolute co-witness for backups.” Lower 1/3 still allows iron use, just in a different part of the window.